MikroTik RouterOS 是基于 Linux 内核的操作系统, 可将计算机变为网络路由器
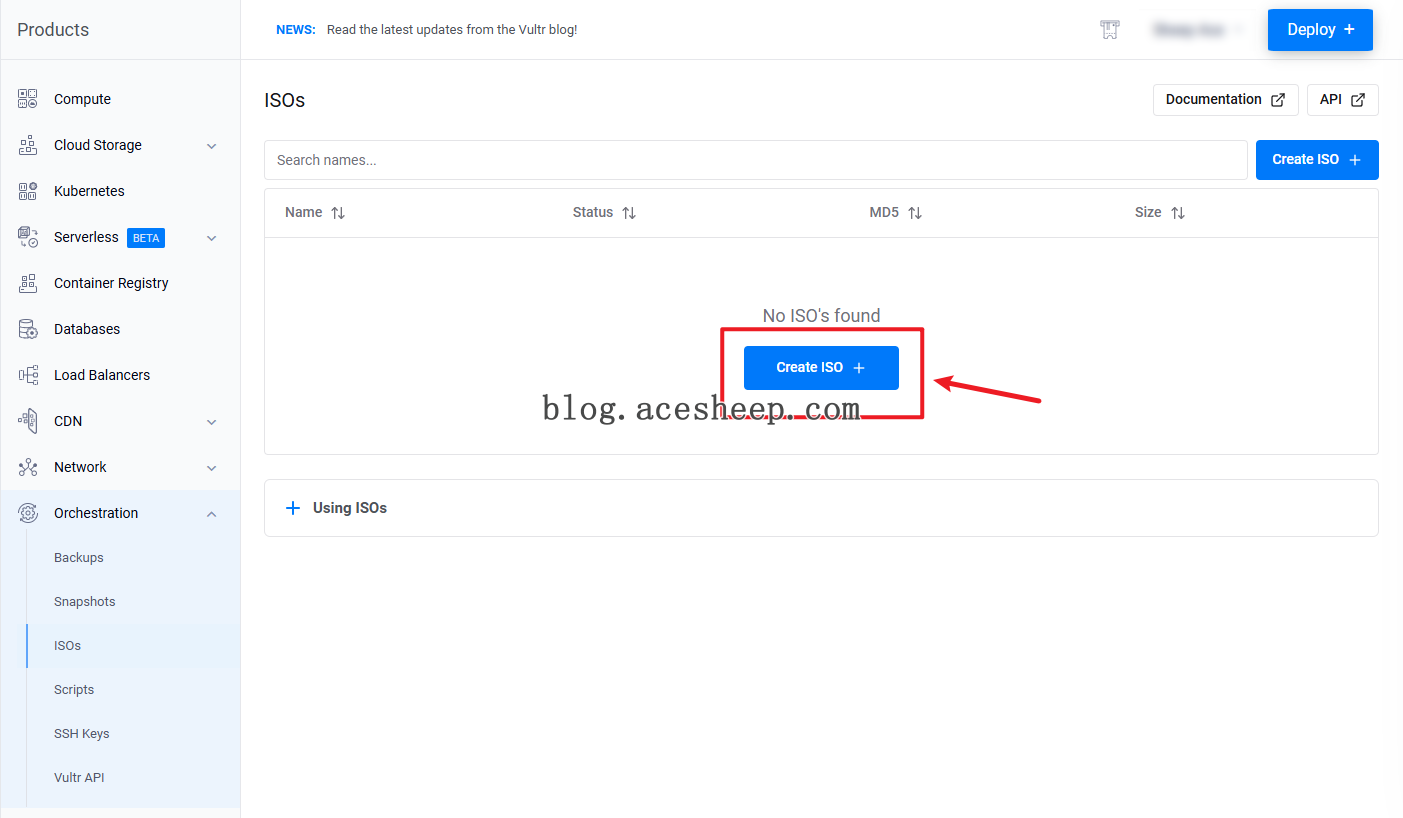
上传 ISO 镜像并创建实例
上传 SystemRescueCD ISO
-
访问 Vultr 的 Add ISO 页面
-
将链接复制并粘贴到
Remote URL文本字段内, 使用 SystemRescueCD 镜像https://fastly-cdn.system-rescue.org/releases/12.02/systemrescue-12.02-amd64.iso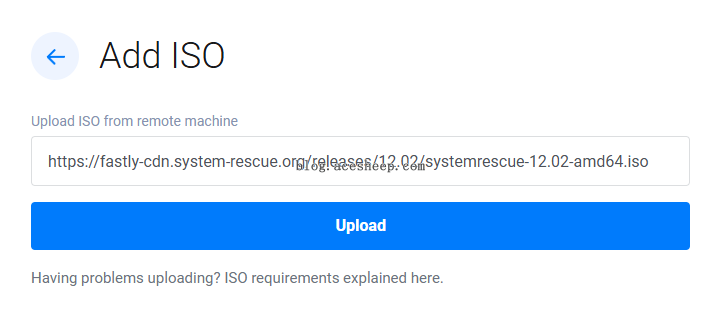
-
点击
Upload按钮, ISO 镜像将被添加到你的账户中
创建 VPS 实例
-
在 Vultr 上按照常规方式创建 VPS, 但在选择
Server Image时选择Upload ISO -
选择
iPXE, 并填入以下引导 URLhttp://boot.ipxe.org/demo/boot.php -
等待 VPS 创建完成
-
进入
VPS->Settings->Custom ISO, 在My ISOs中选择systemrescue-12.02-amd64.iso, 然后点击Attach ISO and Reboot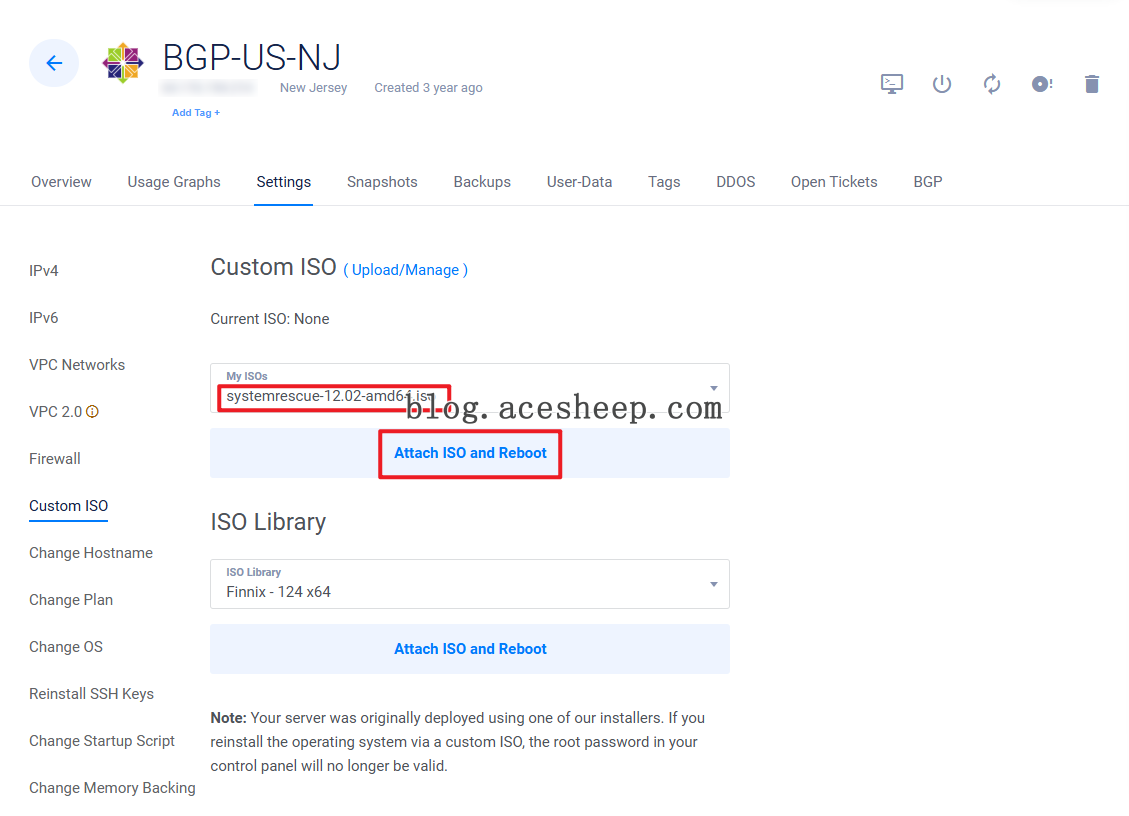
-
启动服务器实例, 进入 SystemRescueCD
下载并安装 MikroTik RouterOS
-
打开浏览器, 访问 MikroTik RouterOS 下载页面
-
滚动到
Cloud Hosted Router(CHR) 部分 -
选择
Raw disk image对应的 长期支持版 (Long-term) 或 最新稳定版 (Stable) -
右键保存图标, 在菜单上选择
Copy link address。镜像 URL 将复制到剪贴板中 -
在 “Vultr 服务器实例” 页面上, 单击
View Console访问正在运行的SystemRescueCD实例的命令行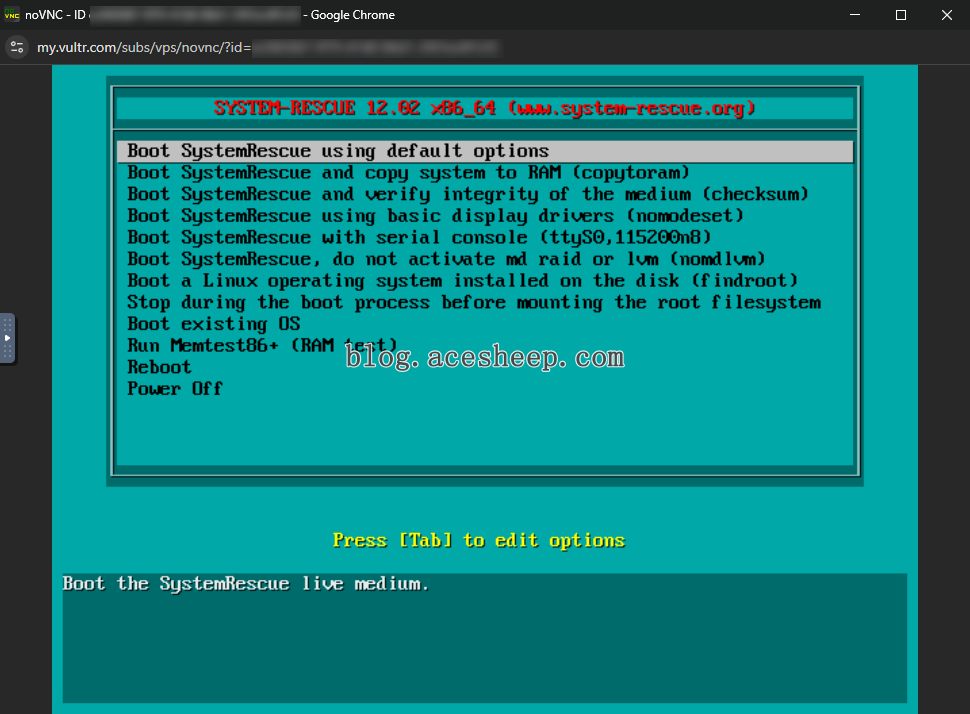
-
进系统后重置一个 root 密码,方便远程 ssh 操作
-
关闭防火墙
systemctl stop iptables, 然后使用 SSH 连接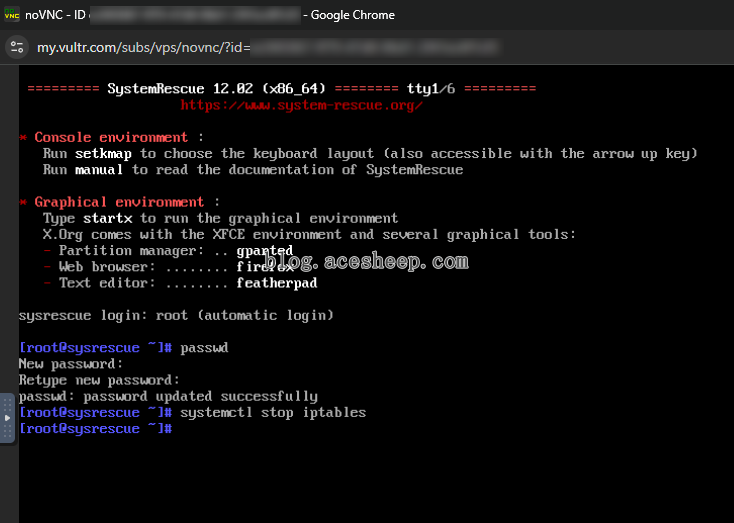
-
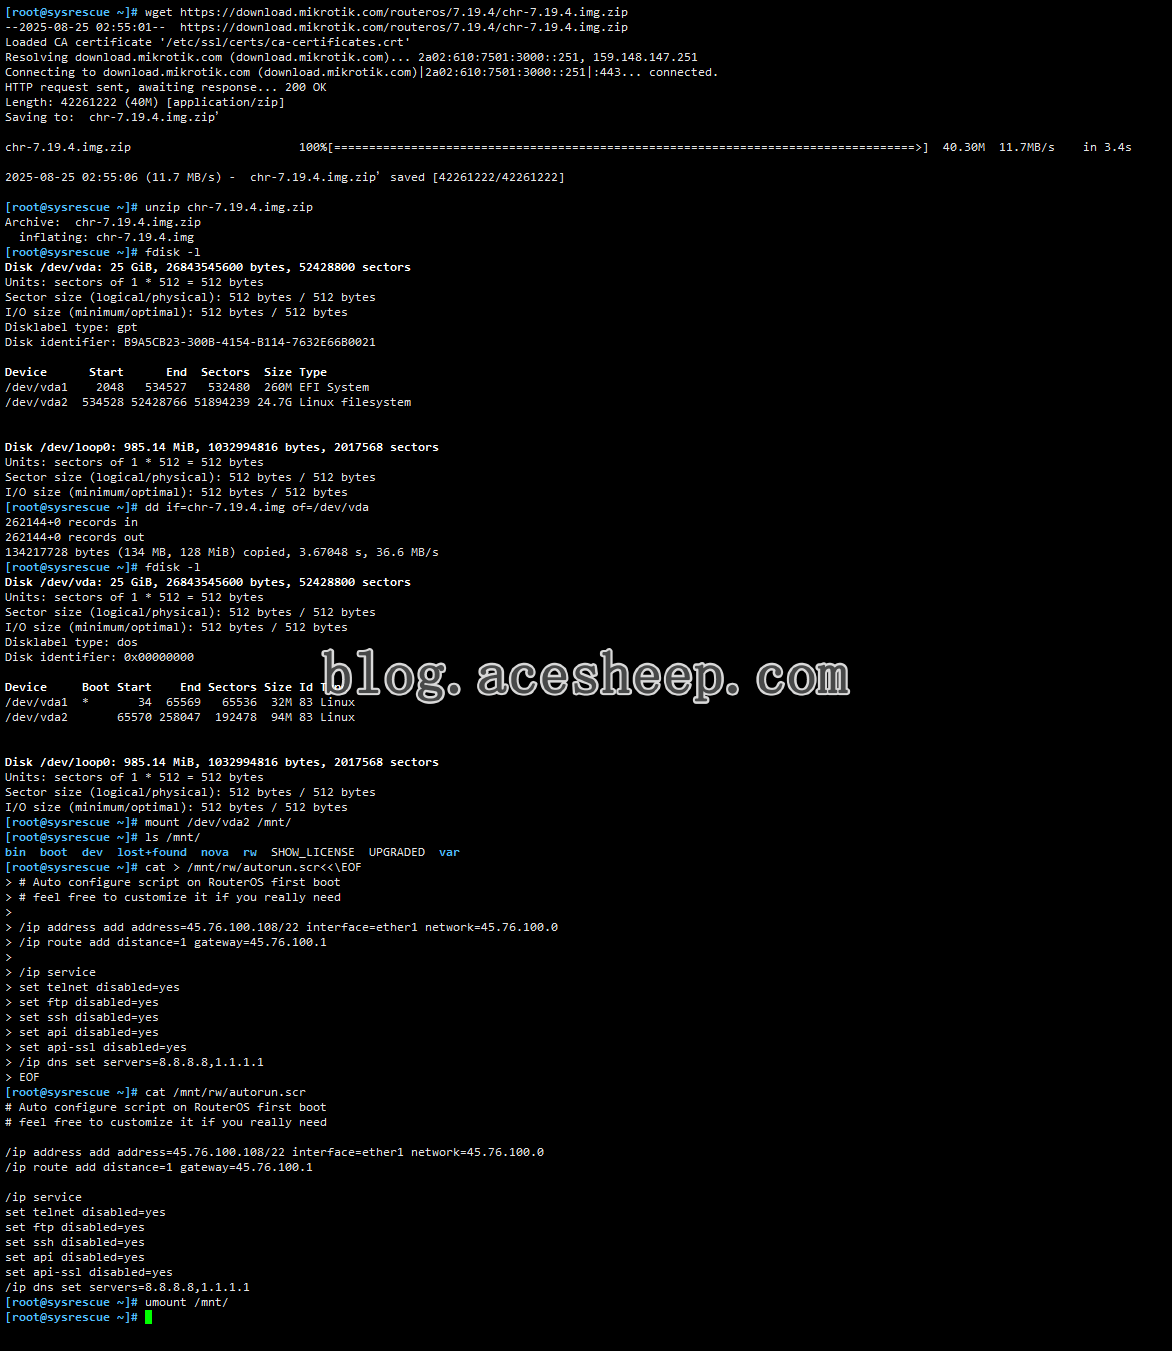
在 SystemRescueCD 控制台中使用
wget命令下载wget https://download.mikrotik.com/routeros/7.19.4/chr-7.19.4.img.zip -
使用
unzip命令解压磁盘映像unzip chr-7.19.4.img.zip -
使用
dd命令将 MikroTik RouterOS 写入 Vultr 磁盘
dd if=chr-7.19.4.img of=/dev/vda
在 dd 时设置 MikroTik 初始配置
在 dd 写入磁盘后, 可以直接在 SystemRescueCD 环境中 设置初始网络配置, 避免首次启动后手动配置。
该脚本将在 RouterOS 首次启动时自动运行, 包括:
- 设置 IPv4 地址 (
45.76.100.108/22) - 配置默认网关 (
45.76.100.1) - 禁用不必要的远程服务 (Telnet、FTP、SSH、API)
- 设置 DNS 服务器 (Google
8.8.8.8& Cloudflare1.1.1.1)
[root@sysresccd ~]# dd if=chr-7.19.4.img of=/dev/vda
[root@sysresccd ~]# mount /dev/vda2 /mnt/
[root@sysresccd ~]# cat > /mnt/rw/autorun.scr<<\EOF
# Auto configure script on RouterOS first boot
# feel free to customize it if you really need

/ip address add address=45.76.100.108/22 interface=ether1 network=45.76.100.0
/ip route add distance=1 gateway=45.76.100.1

/ip service
set telnet disabled=yes
set ftp disabled=yes
set ssh disabled=yes
set api disabled=yes
set api-ssl disabled=yes
/ip dns set servers=8.8.8.8,1.1.1.1
EOF
[root@sysresccd ~]# umount /mnt/
移除 ISO 并启动 MikroTik
-
进入
VPS->Settings->Custom ISO, 点击Remove ISO选项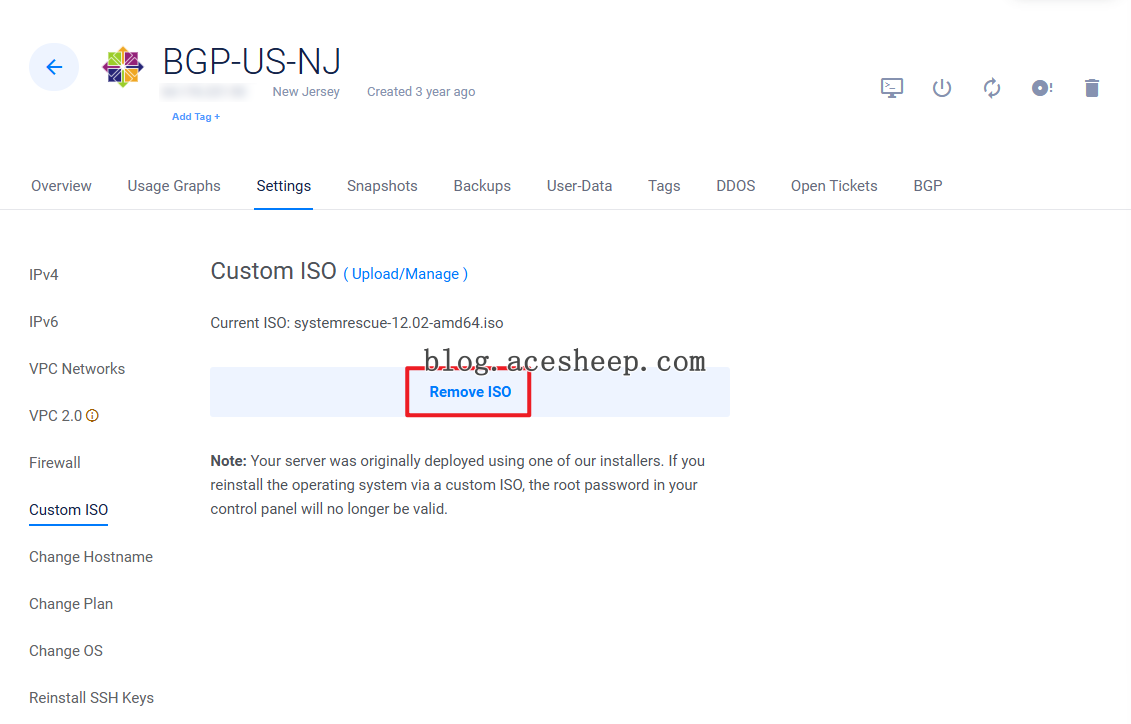
-
VPS 将自动重启, 并进入 MikroTik RouterOS
-
刷新
View Console窗口, 使用默认登录凭据登录。按回车键进入系统用户名: admin 密码: (空)
Mikrotik RouterOS 配置 IPV6
获取 Vultr 分配的 IPv6
在 Vultr 控制台找到服务器分配的 IPv6 地址段
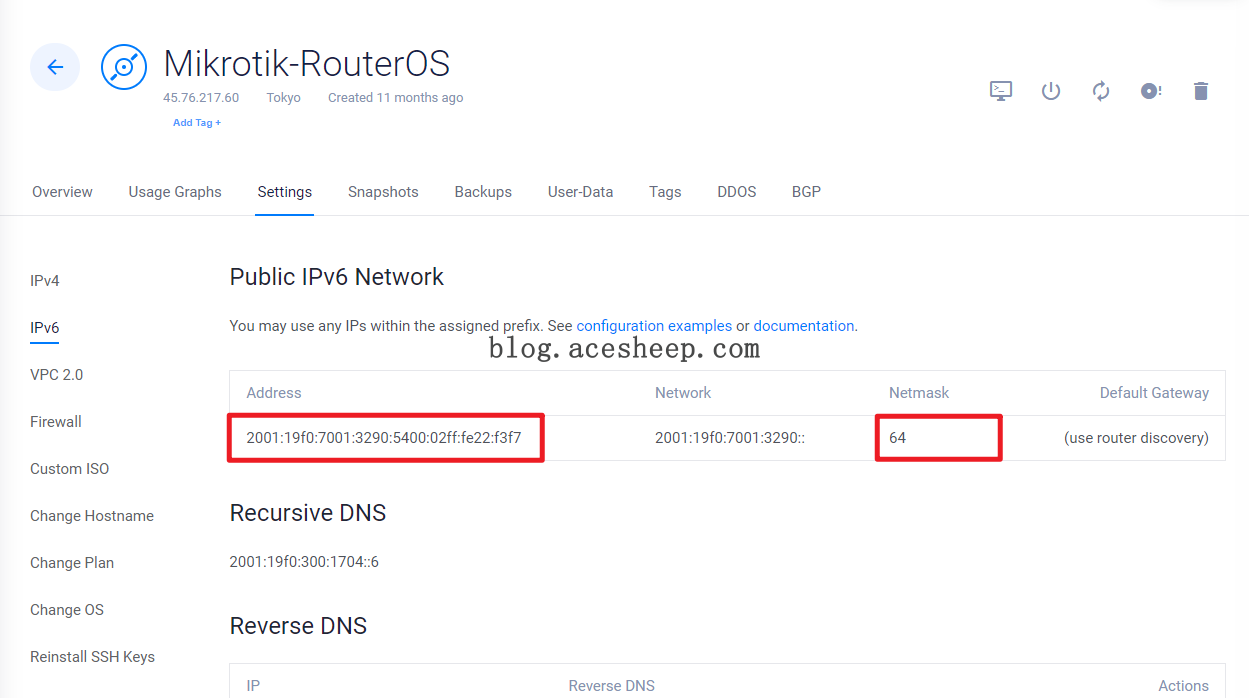
配置 IPv6
使用 WinBox 连接到 MikroTik 进行 IPv6 配置
/ipv6 settings set forward=no
/ipv6 address add interface=WAN address=2001:19f0:7001:3290:5400:02ff:fe22:f3f7/64
/ipv6 route add dst-address=::/0 gateway=fe80::fc00:ff:fe60:fff%ether1
/ipv6 nd set [ find default=yes ] hop-limit=64 interface=ether1 managed-address-configuration=yes other-configuration=yes
测试 IPv6 连接
如果 ping IPv6 地址成功, 则表示 IPv6 配置成功
[admin@MikroTik] > /ping count=3 2001:4860:4860::8888
  SEQ HOST                                     SIZE TTL TIME       STATUS
    0 2001:4860:4860::8888                       56 119 1ms293us   echo reply
    1 2001:4860:4860::8888                       56 119 1ms687us   echo reply
    2 2001:4860:4860::8888                       56 119 1ms313us   echo reply
    sent=3 received=3 packet-loss=0% min-rtt=1ms293us avg-rtt=1ms431us
   max-rtt=1ms687us

[admin@MikroTik] >
原文